Showing posts with label recipe. Show all posts

Saturday, February 14, 2009

Happy Valentine's Day!!


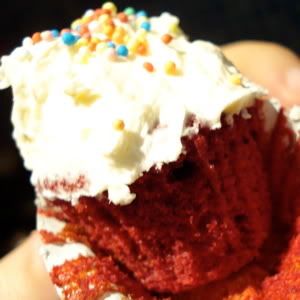
Happy Valentine's Day to all of you out there, and if you're thinking of making something special for that special person (I know it may be a tad bit too late, but hey! Better late than never) then here's a lil recipe I dig up from my food collection/iPhoto collections :) I've baked this twice (once for my class! See what a wonderful class we have, everyone bakes cakes for tea time hahah!) and both times I get rave reviews :p

Original recipe provided from Magnolia bakery in NYC (has been featured in the likes of Sex and the City series), recipe and video instructions can be found here (see, so this is very beginner-friendly).

My alteration from the original recipe: I use 300 g of butter for the cupcakes, I think it's a lil typo on the recipe page since otherwise the cake will be wayyyy too dry. So in total, you will need 300 g butter for the cupcake and 450 g butter for the icing (so in total buy 3 blocks of 250g butter!) I know, it's quite "heavy", but it's worth it!

Cupcakes
Ingredients:
  • 3 1/2 cups cake flour (*see instructions below)
  • 300 grams unsalted butter, softened
  • 2 cups sugar
  • 3 large eggs, at room temperature
  • 6 tablespoons red food colouring (normally 2 bottles, make sure it's the normal red food colouring and not "natural" food colouring which is more expensive and doesn't give the same bright red colour)
  • 3 tablespoons unsweetened cocoa (in the UK, Green & Blacks is a good brand, or use Hershey's everywhere else in the world!)
  • 1 1/2 teaspoons vanilla extract
  • 1 1/2 teaspoons salt
  • 1 1/2 cups buttermilk
  • 1 1/2 teaspoons cider vinegar
  • 1 1/2 teaspoons baking soda
*To make 1 cup of "cake clour": put 2 tablespoons of cornstarch into your 1 cup measurement, fill to the top with all-purpose flour (so for this recipe, do this 3 times). To make 1/2 cup of "cake flour": put 1 tablespoon cornstarch in 1/2 cup measurement, fill to the top with all-purpose flour (for this recipe, do this once). This is the idiot-proof guide of making a cake!

Confused about baking soda (sodium bicarbonate) vs baking powder? Help is here. So read recipes carefully and use what the recipe requires. In this recipe, we use baking soda with buttermilk as the acidifying agent. If you made a mistake and add the wrong one, better just throw the whole thing away, cos it won't do your cake any good.

Method:

Preheat oven to 180°C. Line muffin pans with muffin cases. This will make 2x12 cupcakes (normal muffin size), I usually make 12 normal size cupcakes, and about 24 tiny ones.

Sift flour. Cream the butter until it turns very pale colour and fluffy (5 minutes) on med-high. Reduce to slow-med, slowly add sugar 1 tablespoon at a time. Break 1 egg to a small bowl, add to mixer, repeat until you have incorporated 3 eggs.

Mix red food colouring and vanilla extract on a bowl (I advise you using kitchen gloves as it can get a bit messy), then add cocoa powder, whisk briskly.

Stop the mixer (very important!!! You don't want to splatter everything). Add the colouring mixture very carefully, turn mixer on the lowest setting, then once everything is blended, turn it up to medium speed.

Add a little bit of milk, flour, salt, then milk-flour-milk-flour until you have used up everything.

Mix cider vinegar and baking soda on a small bowl, add to the batter. This will give the batter a very bright red colour!

Scoop with ice cream scoop (I have one that is the perfect size for the normal-size muffin) or use tablespoon. Bake them for 20 minutes (switch positions after 10 minutes to make sure even baking).

Let the cupcakes cool completely on a wire rack. And you can set up the icing!

Icing
Ingredients:
6 tablespoons all-purpose flour
2 cups milk
2 cups (450 grams) unsalted butter, softened
2 cups sugar
2 teaspoons vanilla extract
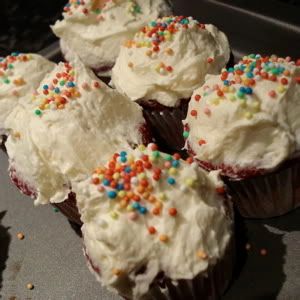
And some sugary sprinkles for decorations!

Method:
Add flour to a saucepan, add milk, whisk slowly, heat in stove, keep whisking until it is very very thick.

Cream butter until pale and fluffy (3 minutes). Add sugar 1 tablespoon at a time. Add vanilla extract, then add the base (the flour and milk mixture) 1 tablespoon at a time.

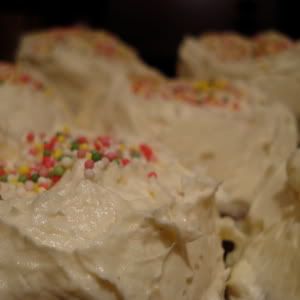
Put icing in fridge for 10-15 minutes max to get harder consistency, then ice generously on cupcakes!

Monday, February 9, 2009

Meatloaf


Yes I'm on a blogging streak!!! haha =D Had this meatloaf for dinner (and lunch as sandwich, with my Focaccia), partly inspired by the Super Bowl... and also because I've been thinking about making meatloaf since I watched an episode of Desperate Housewives when Lynette made some *burnt* meatloaf.

This is a "lighter" version of it, I use half lean Aberdeen angus minced beef and half minced chicken (bought at this Iraqi butcher that keeps adding extra meat to my shopping do and eventually worked up the courage to ask me out, awwwhhhhh *so sweet* but I said no).

Ingredients:

The meats: 1 lb lean minced beef, 1 lb minced chicken (normally people mix minced beef with pork).


The filling: (meatloaf is considered a cheap dinner because people stuff things like oats/breadcrumbs/etc. to expand the volume) ... let me try to remember! (I didn't really have a recipe for this)

1 small tub of wholemeal fresh breadcrumbs (my flatmate's stale wholemeal bread, separate the crumbs, and pulse it on a food processor)
3 cloves of garlic
1 chilli
1 tomato
1 teaspoon pesto
1 egg
1 celery, chopped
1 carrot, roughly chopped
coarse sea salt, black pepper to taste

Method: The best way to mix all this ingredient is using a food processor, or you can also use a very big bowl and mix everything together. Shape it into a loaf tin, top it with homemade tomato sauce (homemade stuffs always taste better!) and rosemary leaves (from yesterday's focaccia making). Bake for 45 minutes in a preheated oven 180C. Once cooked, leave for 15 minutes for juice to settle. Slice them up, and serve!


I served it with spinach, rocket, and carrot salad topped with melted Brie.

Leftovers: Wrap any leftovers in foil, I already prepare tomorrow's lunch - focaccia sandwich with meatloaf and rocket salad, yumm!

PS: my meatloaf looks a little bit on the pale side because of the chicken in it, if you use beef all the way it'll be darker.

Sunday, February 8, 2009

Focaccia (Italian flat-bread)

Focaccia is an Italian flat-bread made with yeast and olive oil, and infused with herbs, in my case, rosemary. My first experience with this hearty bread was when Saadnah and Hanna came to Liverpool and Saadnah went straight into the posh Italian cafe round the corner from my flat called Puccino's and ordered focaccia sandwich. We couldn't resist the temptation to sample that very tasty looking grub, it was so delicious!

So after searching all over the internet for the correct recipe, the correct method, what a good focaccia actually is, etc etc etc.... I came across this recipe at Epicurious, taken from The Bread Bible - and being a faithful Christian of course I have to follow what the Bible says!!! So here it goes...

Ingredients:
  • 1 1/4 cup Organic strong white bread flour (bought it at Matta's)
  • 1 1/4 cup all-purpose flour
  • 1/4 cup whole-wheat flour
  • 1 1/4 teaspoons instant yeast (also known as rapid-rise or bread machine yeast)
  • 1 1/2 teaspoons table salt
  • 1 1/2 cups water, room temperature (20 to 25°C)
  • 1 teaspoon honey
  • 1/4 cup plus 4 teaspoons extra-virgin olive oil
  • 2 tablespoons fresh whole rosemary needles
  • 2 teaspoons coarse sea salt (I used <u>Italian</u> coarse sea salt from Matta's)
  • 1 teaspoon freshly ground black pepper
Method:

In essence, there are 4 ways of making the dough: using a stand mixer (how I long for that KitchenAid, will be one of the first things I buy with my first pay check!), using a bread maker, using a food processor (which I do, it's the <i>fastest and most efficient way</i> says my experienced sources), or traditionally.... by hand! Guide on making the dough can be found on Epicurious. I also read that salt will kill the yeast, so I didn't add salt into the dough until everything else is mixed (once flour and yeast are mixed it's okay apparently). This will produce a very wet and sticky dough, the only downset to using food processor since I had to remove the dough onto a floured surface (yeap, verrryyy carefully peeling that sticky dough from the blade) and knead for a further 4-5 mins. Careful not to add too much extra flour to the dough!

First rise. Lightly oil a large glass bowl with the extra-virgin olive oil (I've put a small amount of extra virgin olive oil on a small bowl that I can easily use) using a pastry brush, then transfer your dough, lightly brush with olive oil. Wrap with cling film, let it rise for 30 mins in a warm place (by the radiator, or you can put it in a cold oven, with the light switched on, you can switch on the fan too). Basically from here onwards, whenever you want to handle the dough, don't add more flour or else your bread will be hard, so after the first 30 mins, I oiled my hands and the work surface. Stretch the bottom part of the dough and fold it up to centre, rotate 90 degrees, do the same for all 4 sides (this is called a package fold). Round it up, smooth side up, lightly oil with olive oil, cover with cling film. Let it rise til it doubles in size, a further 30mins-1 hour.

The yeast will continue rising the dough (CO2) but your dough won't be able to hold its shape once it has expanded to more than 2x its original size, the dough will "explode" and flop. And you'll end up with a very dense bread, so they say~~~

Shaping and second rise. Lightly oil a baking pan (I use a rectangular pan). Transfer dough into your work surface, and shape it so it fits the baking pan. Brush the dough with olive oil again. Cover with cling film, let it rise til it doubles in size - about 1 hour.

Baking the bread! Finally, the bit that you've been waiting for. While the dough is comfortably rising by your heater (what an excuse to turn up the heater in your house heheh), turn the oven on to 250C (max temperature in my oven), it has to be blazingly hot hot hot... Put a cast-iron pan or a heavy baking pan at the bottom of the oven, and put the rack in the middle.

The dough, once it has risen, dimple the dough all over with your fingertips, sprinkle coarse sea salt and black pepper, glaze it with olive oil, and put your rosemary stalks (I put the rosemary in every dimple, so cute!).

Quickly open the oven door, put ice cubes into that hot pan at the bottom of the oven (it will make a steam so as your bread doesn't dry out), and quickly put your bread there.

Bake at 250C for about 15 minutes until it turns golden brown. Transfer it to a cooling rack so the bottom crust doesn't become soggy. Once cooled down, serve. Or in my case, we frantically looked for (and eventually invented) a paper bag to keep it til the next day.

So the minimum rising time will be 2 1/2 hour, baking time 15 minutes. In between the breadmaking process, my flatmate and I went to the cinema - so to prevent my dough bursting and flopped I chilled it in the fridge (after the first rise), it will slow down the yeast.

The verdict.... well my flatmate is Italian and he's quite picky. And he loves it! hehe =D I made him a chicken sandwich for lunch the next day.


Wednesday, September 19, 2007

Otak-Otak (Indonesian grilled fish cake)


*This is what happens when Ale gets a new food processor =)

**Original recipe from here

Ingredients:
350 g mackerel fillet, no skin and bones (I used cod this time, easier to find!)
150 g tapioca starch
100 ml coconut cream (I used about 150ml canned coconut)
1 egg, beaten
1 tsp salt
pepper as you like it (I used a peppermill and basically went around the bowl a few times)
2 tsp sugar
1 tsp chicken stock (I used vet-tsin :p)
15 chinese chives (Matta's wasn't open, alas! And I was too lazy to walk to Chinatown so I substituted this with 2 stalks of spring onion)
Banana leaves to wrap (I bought a bag from Matta's, it was 2 very long banana leaves, and I still have a little bit left)

Peanut chilli sauce:
2 red chillies*
8 red bird's eye chillies*
*I used 12 bird's eye chillies instead
5 cloves garlic
5 candlenuts, toasted
6 tbsp peanut butter (or if you want, fry some peanuts)
1 1/2 tsp sugar
200 ml water
1 tsp rice vinegar
1 tsp salt

For the peanut sauce:
+ Stir fry chillies and garlic til they're soft
+ Put everything in a food processor, blend until smooth

For the fish paste:
+ Put everything in a food processor except coconut milk and egg, then as it's slowly processing the fish, pour in coconut milk and egg slowly
+ Take a dollop (not more than 1 tbsp!) of the paste, put it on the banana leaves, make it elongated, and wrap LOOSELY with banana leaves** stick a toothpick at the end of the leaves to secure it
+ Bake in the oven (I used low temp) til the leaves are dry and the food starts to smell reallyyyyyy gooddd!!
+ Serve with the peanut chilli sauce, and with a big appetite!


** Basically the paste will expand as you cook them (due to the tapioca starch I presume?), I made the mistake of wrapping them too tightly (like rolling a sushi haha) and as a result the leaves cracked and the bit that's exposed dried out :( so some bits are "wrinkly" and it's supposed to be firm, nice and juicy and bouncy....

Tuesday, September 4, 2007

Ayam Betutu (Balinese spiced chicken wrapped in banana leaves)


One of our most favourite Balinese dishes, Ayam Betutu, or Spiced chicken wrapped in banana leaves for the unfamiliar ears, is definitely not your typical student dinner. The delicate recipe took me an hour to prepare, 24 hours to marinade, an hour in the steamer, and a final hour in the oven! But, prepared with so much passion and... dare I say perseverence(?) this dish surely will take your taste buds on a roller-coaster ride, and probably make your momma proud too.

(One thing for sure, it was a heavy-weight challenge for my poor, cheap Haden mini food chopper - it didn't survive the marathon).

Ingredients: (taken liberally from here)

1 whole chicken, cut into small pieces (16 or so)
2 lime
2 banana leaves and aluminium foil to wrap


Spices: (process the following spices in a food processor, or if you prefer... the old n trusted mortar n pestle)
4 lemongrasses, finely angle cut
16 kaffir lime leaves, finely sliced (whole lime leaves are "double ended", so each of them counts as 2)
2 tsp sugar
30 shallots
1 1/2 garlic buds NOT cloves
20 bird's eye chillies (this will be relatively hot, for milder taste use 15)
2 cm ginger, finely sliced
4 tsp ground turmeric
2 cm galangal
4 tbsp ground coriander
2 tsp dried shrimp paste/belacan/terasi
4 tbsp olive oil, add slowly to the mixture
salt as desired

Directions:
1. Wash chicken throughly, pat dry, then drizzle with lime all over and rub with salt. Let it stand for 30 minutes.
2. Grind all spices in a food processor until smooth, careful not to overwork the processor or else you'll have to get a new one like me :(
3. Rub chicken with ground spices.
4. Break each banana leaf into 2, you'll be needing about 3 pieces (= 1 1/2 banana leaves).
5. Place chicken pieces in banana leaves and wrap them up, then wrap the leaves in foil. Marinade overnight.
6. Steam for an hour and then bake for a further hour at 160C.

Selamat makan!!!

Thursday, June 14, 2007

Tempe


Tempe vs. Tahu?

Well, I totally agree with mom, many tofus are of shit quality, they're too sour, even though they're still fresh, but good tofus are always NICE.... Love it. Esp, Japanese silken tofu huahhhhhhhh, ato dibikin Sapo Tofu... My favs. are: tahu bacem, tahu kipas, mabo tofu.... does tofu-fa count (-> kembang tahu) hehehe...

But anw... we can find tofus like everywhere, but TEMPE? Most people never heard of it (they don't know what they're missing!) even some Singaporeans, Malaysians, Bruneians... DOH! Even though they DO have tempe in some of their food (usually some of their fellow countrymen wud correct them, "We DO have tempe, you know like in ....").

I remember asking my ex-boyfriend who was going on a trip to Amsterdam to find tempe, and I specifically told him where to get it from: Chinatown, even through some LJ user I found out where chinatown in Amsterdam is (near sth sth train station etc. etc.) and guess what? He didn't listen obviously, he just got the bit about "tempe" and went to every single DUTCH shop, patisseries, bakeries, etc... Then he texted, "Couldn't find your tempe hun" and I told him to go to Chinatown, and DOH there were plenty. He got me 2 blocks. I was estatic!!!

And when I went home this Easter I brought back one block of tempe too... but somehow they don't taste that nice, a bit sour, or perhaps they've gone BADDD? from the 13++ hours of travelling? Oh dear...

Best tempe experience... at Loro Djonggrang, a cross between Indon restaurant and an art gallery, ordered this "home-made" tempe which was recommended by the waiting staff, and boy oh boy was it good!!! It was just the juiciest tempe, you could really taste the soya beans.... the grains... it was rich in flavour, and although it was cooked with batter (sort of tempe mendoan style) the flav. of the batter didn't superimposed the natural fresh taste of FRESH HOMEMADE TEMPE, haha... seriously...

And it was also helped with fantastic presentation, and I really shud've taken more pics of the tempe hehehhee...

Got this tempe vs. tahu joke from some random googling:

Takkala temperatur terik terbakar terus, tukang tempe tetap tabah,

"Tempe-tempe", teriaknya. Ternyata teriakan tukang tempe tadi terdengar

tukang tahu, terpaksa teriakannya tambah tinggi, "Tahu-tahu-tahu!"

"Tempenya terbaik, tempenya terenak, tempenya terkenal!!", timpal

tukang tempe. Tukang tahu tidak terima,"Tempenya tengik, tempenya

tawar,tempenya terjelek!"

Tukang tempe tertegun, terhenyak, "Teplakkk...!" tamparannya tepat

terkena tukang tahu. Tapi tukang tahu tidak terkalahkan, tendangannya

tepat terkena tulang tungkai tukang tempe.

Tukang tempe terjengkang tumbang! Tapi terus tegak, tatapannya

terhunus tajam terhadap tukang tahu. Tetapi, tukang tahu tidak

terpengaruh tatapan tajam tukang tempe tersebut, "Tidak takut!!!"

tantang tukang tahu.

Tidak ternyana tangan tukang tempe terkepal, tinjunya terarah, terus

tonjokkannya tepat terkena tukang tahu, tak terelakkan! Tujuh

tempat terkena tinjunya, tonjokan terakhir tepat terkena telak.

Tukang tahu terjerembab. "Tolong... tolong... tolong...!", teriaknya

terdengar tinggi. Tetapi tanpa tunda tempo, tukang tempe teruskan

teriakannya, "Tempe... tempe.... tempe...!

TAMAT

Sunday, January 28, 2007

Golden Squash Soup


Okay, I promised you all, that this will be the last recipe entry for this weekend ;) Basically, after cooking curries for 2 straight nights, I feel kinda guilty and wanted to redeem myself, by cooking something healthy =) Found this great website which promotes healthy eating and as a side to the Thai green curry, I also cooked this golden squash soup ;)

I didn't use many of the spices mentioned in the original recipe, I found that the squash (labu kuning in Indonesia?) was naturally sweet.

So my version of the golden squash soup:

1 medium sized butternut squash, peeled and cut into cubes (the squash was really hard to peel, what an exercise! My friend mocked that it's "healthy" because of the exercise we do when peeling and cutting the fruit!)
1 onion, chopped
3 cloves garlic, chopped
3 cups chicken broth
200 g coconut milk (from can)

- Saute onion and garlic, then add the broth and the squash pieces. Cook uncovered for about 15 minutes until the squash is soft (and I mean, soft! Semi pulpy)

- Leave it to cool for around 5 mins

- Place some of the squash and broth into a blender, add a little bit of coconut milk and blend until smooth. Repeat til you've blended all the squash and broth in the pan.


- Bring back to a stove to reheat, and garnish with a sprig of mint/cilantro/coriander leaf.

=)

This soup is an excellent source of Vit A, C, manganate, and also a good source of fiber (one serving of it gives 20% of DV).

Kari Kapitan (Captain's Curry)


The Thai green curry was my 2nd attempt of making curry from scratch. The first one was this, Kari Kapitan (Captain's Curry), a Malaysian kinda curry that my friend's mom cooked when I stayed over in London. When I made it, it was a lil bit too spicy for my tongue, so in this recipe the amount of chillies have been reduced, and I substitute it with tomatoes, to give the same red colour.

The night before, I took out the chicken pieces (I asked the butcher to cut 1 chicken into 16 small pieces) and marinaded it with tamarind, salt, pepper, and lime juice.


The paste:
+ 6 dried chillies, soaked, remove seeds
+ 8 red chillies
+ 2 tomatoes
+ 4 shallots
+ 1 bulb garlic
+ 2 tsp ground turmeric
+ 6 lemongrass
+ 1 piece terasi/belacan/shrimp paste

Blend them in a food processor until it becomes a paste, then fry with a little oil until fragrant.


Then, add 300 ml coconut milk, the juice of one lime, and a few slices (I used about 5) of bay leaves. Reduce heat to medium low, and add the chicken. Simmer for around 20 mins until chicken is cooked and the curry sauce has cooked well.


Enjoy!

Ale's Thai Green Curry


Yep, it's done!!! And it was so lovely me and Arthur almost forgot to take pics of it!!!

I couldn't blend the galangal with the rest of the paste (chillies, coriander leaves, basil leaves, etc.) so I just added them later after the coconut milk!

I used 22 green bird eye chillies, and it's just nice, a bit spicy, but not too much it'll make you sweat =)


Recipe here.

Saturday, January 27, 2007

Thai Green Curry


Will try cooking this tomorrow, and will definitely update afterwards - my first attempt of making curries (different curries) from scratch! (Cooked "Kari Kapitan" the other day, will upload the pics later)

Pic above is taken from Delia and the recipe is compiled from various sites, notably this

The Paste:
20 whole green bird eye chillies (cabe rawit)
20 white peppercorns, ground finely (3 tsp of ground white pepper?)
1 stalk of lemon grass, chop and use only the bottom third, soaked for 30 mins with 2 tbsp of lime juice (mine actually comes from a jar, so I use 3, since it's less pungent)
7 thin slices of dried galangal or 1 tbsp chopped fresh galangal (I hope my food processor can survive the dried galangal)
2 tbsp chopped basil leaves
1 tsp chopped coriander leaves
1/2 tsp roasted ground coriander seeds
1/2 tsp roasted ground cumin seeds
1 tsp coarse sea salt
4 shallots, roughly chopped (doesn't really matter since everything will go into the food processor)
4 garlic cloves, peeled
2 tsp young ginger, chopped
2 tsp shrimp paste (terasi bakar or belacan)

Put everything into a food processor, and the paste should be a bit coarse. If you want, you can smoothen it out by using mortar and pestle (but that's the whole point we're using food processor isn't it? To AVOID mortar n pestle).

This can be prepared ahead of time and stored in the fridge.

Now is the rest of the recipe.

Ingredients
600 ml coconut milk (from 2 cans)
280-300 g chicken breast, cut into large cubes
1 large aubergine, cut into wedges
1 courgette, cut into wedges
200 g green beans, cut into strips
2 red onions, cut into slices
3 tbsp green curry paste (more or less, to taste)
7 kaffir lime leaves
25 g basil leaves
lime juice to taste (about the juice of 1/2 lime)
4 tsp fish sauce
1 tsp palm sugar (I'm going to substitute this with demerara sugar)
1 red chilli, cut diagonally into strips, for garnish

Method
+ Coconut milk: put the tins upside down on a work surface, open. Separate the milky bit and the creamy bit.
+ Heat the wok on high, when it's hot pour 3/4 of the cream, stir until it's curdled.
+ Add curry paste to it, followed by the rest of the coconut milk and the kaffir lime leaves. Keep stirring so the coconut milk doesn't stick.
+ Reduce the heat to low, add fish sauce (for saltiness), sugar (for sweetness), and lime juice (for sourness).
+ Add vegetables and chicken, simmer for 20mins.
+ Add chopped red onions, cook for a couple of minutes, then add basil leaves and sliced red chillies. These are for garnish.

Done! Served with Thai jasmine rice, hmmmmmpph!

Wednesday, January 24, 2007

Lidah Kucing (Lenguas de Gato/Cat's Tongue)


Ingredients:
+ 150 g margarine
+ 100 g butter

leave at room temperature for a few hours to soften

+ 200 g caster sugar
+ 100 ml egg white (roughly from 3 large eggs)
+ 1 tsp vanilla essence (not too much since it's supposed to taste buttery)

+ 200 g flour
+ 50 g corn flour

mix well then sieve

1. Cream margarine, butter, and sugar until smooth\
2. Add egg white and vanilla, keep whisking
3. Add flour, mix well
4. Add dough to a pipping bag
5. Squeeze into a baking sheet, place in a preheated oven (150C) for about 10mins until golden brown

Voila!


View original recipe.