Saturday, February 14, 2009

Happy Valentine's Day!!


Happy Valentine's Day to all of you out there, and if you're thinking of making something special for that special person (I know it may be a tad bit too late, but hey! Better late than never) then here's a lil recipe I dig up from my food collection/iPhoto collections :) I've baked this twice (once for my class! See what a wonderful class we have, everyone bakes cakes for tea time hahah!) and both times I get rave reviews :p

Original recipe provided from Magnolia bakery in NYC (has been featured in the likes of Sex and the City series), recipe and video instructions can be found here (see, so this is very beginner-friendly).

My alteration from the original recipe: I use 300 g of butter for the cupcakes, I think it's a lil typo on the recipe page since otherwise the cake will be wayyyy too dry. So in total, you will need 300 g butter for the cupcake and 450 g butter for the icing (so in total buy 3 blocks of 250g butter!) I know, it's quite "heavy", but it's worth it!

Cupcakes
Ingredients:
  • 3 1/2 cups cake flour (*see instructions below)
  • 300 grams unsalted butter, softened
  • 2 cups sugar
  • 3 large eggs, at room temperature
  • 6 tablespoons red food colouring (normally 2 bottles, make sure it's the normal red food colouring and not "natural" food colouring which is more expensive and doesn't give the same bright red colour)
  • 3 tablespoons unsweetened cocoa (in the UK, Green & Blacks is a good brand, or use Hershey's everywhere else in the world!)
  • 1 1/2 teaspoons vanilla extract
  • 1 1/2 teaspoons salt
  • 1 1/2 cups buttermilk
  • 1 1/2 teaspoons cider vinegar
  • 1 1/2 teaspoons baking soda
*To make 1 cup of "cake clour": put 2 tablespoons of cornstarch into your 1 cup measurement, fill to the top with all-purpose flour (so for this recipe, do this 3 times). To make 1/2 cup of "cake flour": put 1 tablespoon cornstarch in 1/2 cup measurement, fill to the top with all-purpose flour (for this recipe, do this once). This is the idiot-proof guide of making a cake!

Confused about baking soda (sodium bicarbonate) vs baking powder? Help is here. So read recipes carefully and use what the recipe requires. In this recipe, we use baking soda with buttermilk as the acidifying agent. If you made a mistake and add the wrong one, better just throw the whole thing away, cos it won't do your cake any good.

Method:

Preheat oven to 180°C. Line muffin pans with muffin cases. This will make 2x12 cupcakes (normal muffin size), I usually make 12 normal size cupcakes, and about 24 tiny ones.

Sift flour. Cream the butter until it turns very pale colour and fluffy (5 minutes) on med-high. Reduce to slow-med, slowly add sugar 1 tablespoon at a time. Break 1 egg to a small bowl, add to mixer, repeat until you have incorporated 3 eggs.

Mix red food colouring and vanilla extract on a bowl (I advise you using kitchen gloves as it can get a bit messy), then add cocoa powder, whisk briskly.

Stop the mixer (very important!!! You don't want to splatter everything). Add the colouring mixture very carefully, turn mixer on the lowest setting, then once everything is blended, turn it up to medium speed.

Add a little bit of milk, flour, salt, then milk-flour-milk-flour until you have used up everything.

Mix cider vinegar and baking soda on a small bowl, add to the batter. This will give the batter a very bright red colour!

Scoop with ice cream scoop (I have one that is the perfect size for the normal-size muffin) or use tablespoon. Bake them for 20 minutes (switch positions after 10 minutes to make sure even baking).

Let the cupcakes cool completely on a wire rack. And you can set up the icing!

Icing
Ingredients:
6 tablespoons all-purpose flour
2 cups milk
2 cups (450 grams) unsalted butter, softened
2 cups sugar
2 teaspoons vanilla extract
And some sugary sprinkles for decorations!

Method:
Add flour to a saucepan, add milk, whisk slowly, heat in stove, keep whisking until it is very very thick.

Cream butter until pale and fluffy (3 minutes). Add sugar 1 tablespoon at a time. Add vanilla extract, then add the base (the flour and milk mixture) 1 tablespoon at a time.
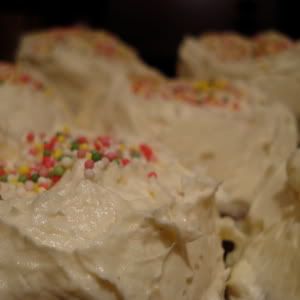
Put icing in fridge for 10-15 minutes max to get harder consistency, then ice generously on cupcakes!

Wednesday, February 11, 2009

Diet 101: Ale's guide to healthy living


Hi, I think people around me will already know that I have been trying to lose weight (re: one of my wishes for 2009)! Today is halfway through week 4, and I have shed around 4-5 kgs of weight (hopefully FAT), my clothes are looser (wearing my belt 1 hole 'in'), my tummy flatter, and I definitely feel "lighter" during my runs. I'm not being snooty here, after all I'm only halfway there and I bet you... the latter half of the "diet" is the hardest part! In fact, I'm trying to share some ins and outs of my dieting. Will try to keep it as short as possible...

S = D x (T + N + R)

S is the success that you will achieve, D is the determination that you have to achieve success, T is the training (re: exercise!!!) that you use, N is your nutritional programme, and R stands for rest and recovery. This is the basic principle of bodybuilding, and basically... have you ever seen a fat bodybuilder? So this basic principle applies to everyone, not limited to Schwarzenegger-wannabes.

So to begin with, how strong is your intention to lose weight? Be realistic. Write down how much weight you want to lose and over what period of time. I want to lose 8-10 kgs and get that bikini body all girls dream of for the summer.

Now let's get down to the exercise. This depends on your base fitness levels. Head down to your local gym and have a word with the trainers there, most gym can create a personalised fitness programme for you free of charge. Some say that if you have programmes, then you are 50% more likely to achieve your goal. Make sense! So stop wandering around in the gym, hopping from one equipment to the next one. Have a goal, and remember the R in the equation: rest and recovery. There is no point exercising all muscle groups every single day of the week. It will actually be detrimental to your body!

This is my exercise programme: run for around 30 minutes (I am using a separate interval training programme I downloaded from iTunes that take me to running 5K, 8K, and 10K), weights for 30-45 minutes, then step machine for final fat burning phase+toning the gluts. I have 3 programmes for weights, so I have to go 3 times a week or otherwise I won't exercise all muscle groups: first one is the chest, shoulder, and triceps, second is the legs, and third is the back, posterior deltoids, and biceps. By doing this, each muscle groups would have 1 week of rest, it also gives me more time to fully work out those muscle groups each time I train. Don't do anything half-heartedly!

And finally..... we come to the last, and possibly most important factor of all: Nutrition.

And I have to emphasise again, determination. Everyone has specific goals, what are yours? Why are you doing it? There is no point if it's because someone is making you do it. You'll probably do a good 1-2 weeks max and then have a binge at the weekends. It's fruitless. Having a trusted friend that can motivate and keep you on the right track is important, because you will reach the point when you feel like you want to give up (it's impossible to do/you feel you've done enough and it's not worth all the trouble), having someone who can remind you on your initial goals, why you want to do this afterall.

So yes, you are very determined, then what do you need to do next? Well, Epicurious has done a very nice summary of all the popular diets around, what they actually mean, what food you must cross out from your list, and who it's particularly good for. My personal opinion is that, during your "dieting" period you need to stick to a fairly strict diet, if it calls for low-carbs then make sure it is low-carbs. Avoid pasta/rice/starchy food and sugary products especially at night time (this also goes for fruits as they contain simple sugars, I try to have all my fruit intake for the day before 6pm). Once you have reached your goal, then you can be more relaxed and switch to a "maintenance" diet (Mediterranean diet, anyone?). Why? Because I think in the beginning it helps if you can see and feel the difference, so you need to shed those pounds quickly, then try to maintain a more steady approach and make sure you continue losing weight, although more slowly.

On a typical day I would have: Weetos cereal (wholemeal, lots of fiber, I use a measuring cup to control the amount I eat) with skimmed milk for breakfast, a pasta salad/couscous salad/(focaccia!) sandwich and a pot of Muller's light yogurt for lunch, some fruits (oranges, strawberries, blueberries) for afternoon post-work nibbles, and for dinner it'll be fish/chicken/lean meat that is baked/steamed/poached/grilled with roasted vegetables/salads. Avoid using oil in cooking (yes, we can!), avoid fatty meats (pork, lamb, duck), avoid added sugar and processed food.

Ok, that's it for now! Good luck!

Monday, February 9, 2009

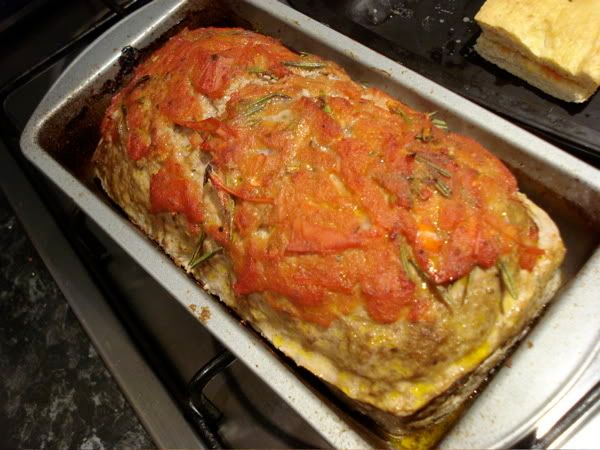
Meatloaf


Yes I'm on a blogging streak!!! haha =D Had this meatloaf for dinner (and lunch as sandwich, with my Focaccia), partly inspired by the Super Bowl... and also because I've been thinking about making meatloaf since I watched an episode of Desperate Housewives when Lynette made some *burnt* meatloaf.

This is a "lighter" version of it, I use half lean Aberdeen angus minced beef and half minced chicken (bought at this Iraqi butcher that keeps adding extra meat to my shopping do and eventually worked up the courage to ask me out, awwwhhhhh *so sweet* but I said no).

Ingredients:

The meats: 1 lb lean minced beef, 1 lb minced chicken (normally people mix minced beef with pork).


The filling: (meatloaf is considered a cheap dinner because people stuff things like oats/breadcrumbs/etc. to expand the volume) ... let me try to remember! (I didn't really have a recipe for this)

1 small tub of wholemeal fresh breadcrumbs (my flatmate's stale wholemeal bread, separate the crumbs, and pulse it on a food processor)
3 cloves of garlic
1 chilli
1 tomato
1 teaspoon pesto
1 egg
1 celery, chopped
1 carrot, roughly chopped
coarse sea salt, black pepper to taste

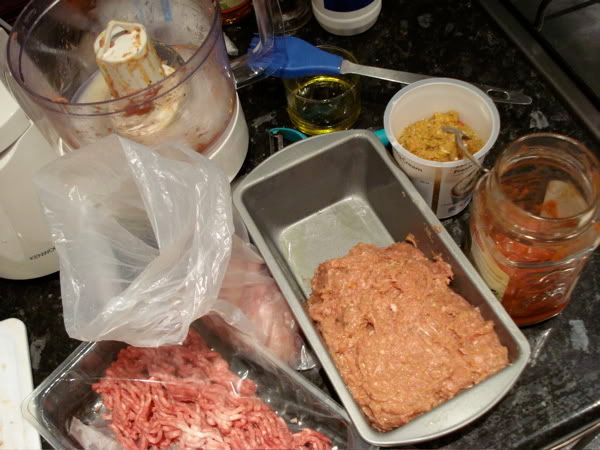
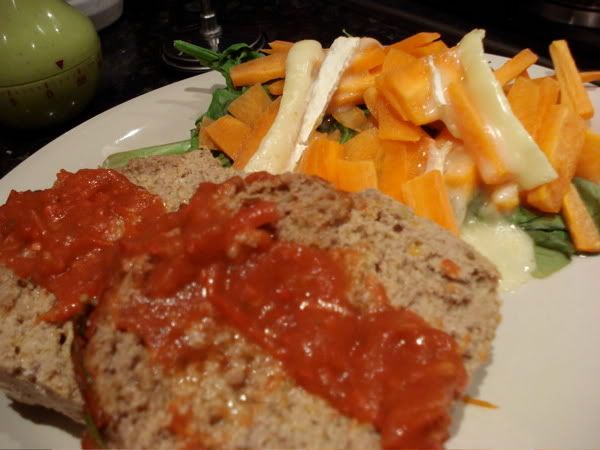
Method: The best way to mix all this ingredient is using a food processor, or you can also use a very big bowl and mix everything together. Shape it into a loaf tin, top it with homemade tomato sauce (homemade stuffs always taste better!) and rosemary leaves (from yesterday's focaccia making). Bake for 45 minutes in a preheated oven 180C. Once cooked, leave for 15 minutes for juice to settle. Slice them up, and serve!


I served it with spinach, rocket, and carrot salad topped with melted Brie.

Leftovers: Wrap any leftovers in foil, I already prepare tomorrow's lunch - focaccia sandwich with meatloaf and rocket salad, yumm!

PS: my meatloaf looks a little bit on the pale side because of the chicken in it, if you use beef all the way it'll be darker.

Sunday, February 8, 2009

Focaccia (Italian flat-bread)

Focaccia is an Italian flat-bread made with yeast and olive oil, and infused with herbs, in my case, rosemary. My first experience with this hearty bread was when Saadnah and Hanna came to Liverpool and Saadnah went straight into the posh Italian cafe round the corner from my flat called Puccino's and ordered focaccia sandwich. We couldn't resist the temptation to sample that very tasty looking grub, it was so delicious!

So after searching all over the internet for the correct recipe, the correct method, what a good focaccia actually is, etc etc etc.... I came across this recipe at Epicurious, taken from The Bread Bible - and being a faithful Christian of course I have to follow what the Bible says!!! So here it goes...

Ingredients:
  • 1 1/4 cup Organic strong white bread flour (bought it at Matta's)
  • 1 1/4 cup all-purpose flour
  • 1/4 cup whole-wheat flour
  • 1 1/4 teaspoons instant yeast (also known as rapid-rise or bread machine yeast)
  • 1 1/2 teaspoons table salt
  • 1 1/2 cups water, room temperature (20 to 25°C)
  • 1 teaspoon honey
  • 1/4 cup plus 4 teaspoons extra-virgin olive oil
  • 2 tablespoons fresh whole rosemary needles
  • 2 teaspoons coarse sea salt (I used <u>Italian</u> coarse sea salt from Matta's)
  • 1 teaspoon freshly ground black pepper
Method:

In essence, there are 4 ways of making the dough: using a stand mixer (how I long for that KitchenAid, will be one of the first things I buy with my first pay check!), using a bread maker, using a food processor (which I do, it's the <i>fastest and most efficient way</i> says my experienced sources), or traditionally.... by hand! Guide on making the dough can be found on Epicurious. I also read that salt will kill the yeast, so I didn't add salt into the dough until everything else is mixed (once flour and yeast are mixed it's okay apparently). This will produce a very wet and sticky dough, the only downset to using food processor since I had to remove the dough onto a floured surface (yeap, verrryyy carefully peeling that sticky dough from the blade) and knead for a further 4-5 mins. Careful not to add too much extra flour to the dough!

First rise. Lightly oil a large glass bowl with the extra-virgin olive oil (I've put a small amount of extra virgin olive oil on a small bowl that I can easily use) using a pastry brush, then transfer your dough, lightly brush with olive oil. Wrap with cling film, let it rise for 30 mins in a warm place (by the radiator, or you can put it in a cold oven, with the light switched on, you can switch on the fan too). Basically from here onwards, whenever you want to handle the dough, don't add more flour or else your bread will be hard, so after the first 30 mins, I oiled my hands and the work surface. Stretch the bottom part of the dough and fold it up to centre, rotate 90 degrees, do the same for all 4 sides (this is called a package fold). Round it up, smooth side up, lightly oil with olive oil, cover with cling film. Let it rise til it doubles in size, a further 30mins-1 hour.

The yeast will continue rising the dough (CO2) but your dough won't be able to hold its shape once it has expanded to more than 2x its original size, the dough will "explode" and flop. And you'll end up with a very dense bread, so they say~~~

Shaping and second rise. Lightly oil a baking pan (I use a rectangular pan). Transfer dough into your work surface, and shape it so it fits the baking pan. Brush the dough with olive oil again. Cover with cling film, let it rise til it doubles in size - about 1 hour.

Baking the bread! Finally, the bit that you've been waiting for. While the dough is comfortably rising by your heater (what an excuse to turn up the heater in your house heheh), turn the oven on to 250C (max temperature in my oven), it has to be blazingly hot hot hot... Put a cast-iron pan or a heavy baking pan at the bottom of the oven, and put the rack in the middle.

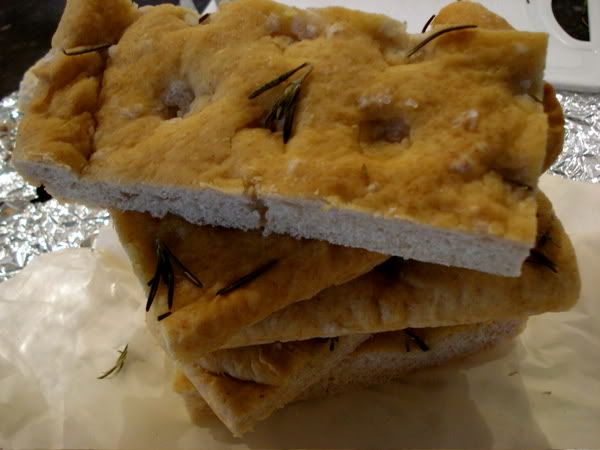
The dough, once it has risen, dimple the dough all over with your fingertips, sprinkle coarse sea salt and black pepper, glaze it with olive oil, and put your rosemary stalks (I put the rosemary in every dimple, so cute!).

Quickly open the oven door, put ice cubes into that hot pan at the bottom of the oven (it will make a steam so as your bread doesn't dry out), and quickly put your bread there.

Bake at 250C for about 15 minutes until it turns golden brown. Transfer it to a cooling rack so the bottom crust doesn't become soggy. Once cooled down, serve. Or in my case, we frantically looked for (and eventually invented) a paper bag to keep it til the next day.

So the minimum rising time will be 2 1/2 hour, baking time 15 minutes. In between the breadmaking process, my flatmate and I went to the cinema - so to prevent my dough bursting and flopped I chilled it in the fridge (after the first rise), it will slow down the yeast.

The verdict.... well my flatmate is Italian and he's quite picky. And he loves it! hehe =D I made him a chicken sandwich for lunch the next day.